Photo Jewelry Making Supplies and Tutorials |
|||||

How to Make A Glass and Bottle Cap Magnet |
|---|
|
|
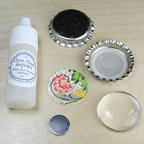
What you will need: |
|
|
|
|
|
Step 1: Punch decorative paper using a 1” circle punch. If you purchased the kit, the paper has already been punched for you. |
|
|
|
|
|
Step 2: Use Glamour Glaze or Glamour Glue to coat either the glass or the paper. Press glass to paper removing air from between the glass and the paper. Let dry. |
|
|
|
|
|
Step 3: Either use more Glamour Glaze or Glamour Glue to glue the glass into the bottle cap, or attach a Glamour Stickies disc to the paper and remove protective backing and attach to the inside of the bottle cap. |
|
|
|
|
|
Step 4: |
|
|
|
|
|
Finished! |
|
|
|
Notes: If you are using inkjet prints, you will need to use
|
||


SHOP | VIP CLUB | GALLERY | FAQ | TUTORIALS | BLOG | ABOUT US | CONTACT US | PRIVACY | SHIPPING
Copyright © 2014 Annie Howes Keepsakes All Rights Reserved.